- New graphics (Again...) -> Update all images and re-name.
- Actually bother anchoring stuff that isn't the contents page
- Quadrants section.
- Remove move, switch with inspect -> Possibly need espionage section.
- Mountains reference.
- New base xp formula?
- Renumber figures/formulas in file manager (Low priority; for my own convenience)
- External link section
- Update tech related images for new names (Low Priority. Just not important enough)
- Getting started/tactics section (Still undecided)
- Become a grammar nazi to tidy up the errors.
- 3. Game UI -> New images, Update figure info sections.
- 3. Commands -> New Image, Reshuffle Blocks, Inspect Command
- 4. Stats Image -> Quick Inspect
- 4. Base XP Formula
- 5. Purchaseable technology -> image needs changing from points to credits
- 7. Quadrants tab needs doing
- 8. Orb and landmark image -> needs co-ordinates adding
- 10. External links section needs doing.
A: That's the whole point of this tutorial. So that you can learn how to play.
Q. I don't care, I'm illiterate and can't read. How do I play?
A: Click the help button in the top right corner of the game screen and it will go over the basics of the games UI and what each of the buttons do.
Q. I keep getting the attack failed message when I attack a tile. Why?
That depends on if it's PvE or PvP. With PvE check your Geo Eff, it tells you the percentage chance of capturing a neutral tile. With PvP it depends on both your Geo Eff value, attibutes and finished off with a sprinkling of luck. Either the enemy has better attributes than you or you're just unlucky.
Q. My Geo Eff is too low how do I make it higher?
Geo eff is influenced by how big and square your base is. Diagonals or branches will hit your Geo Eff value hard so evacuate tiles or build around them to make it more square. Failing that increase your air combat attribute and your Geo Eff value will also increase.
Q. I don't have any credits how can I get more?
Credits are earned every 15 minutes if you control a prize orb. You also gain credits by leveling up.
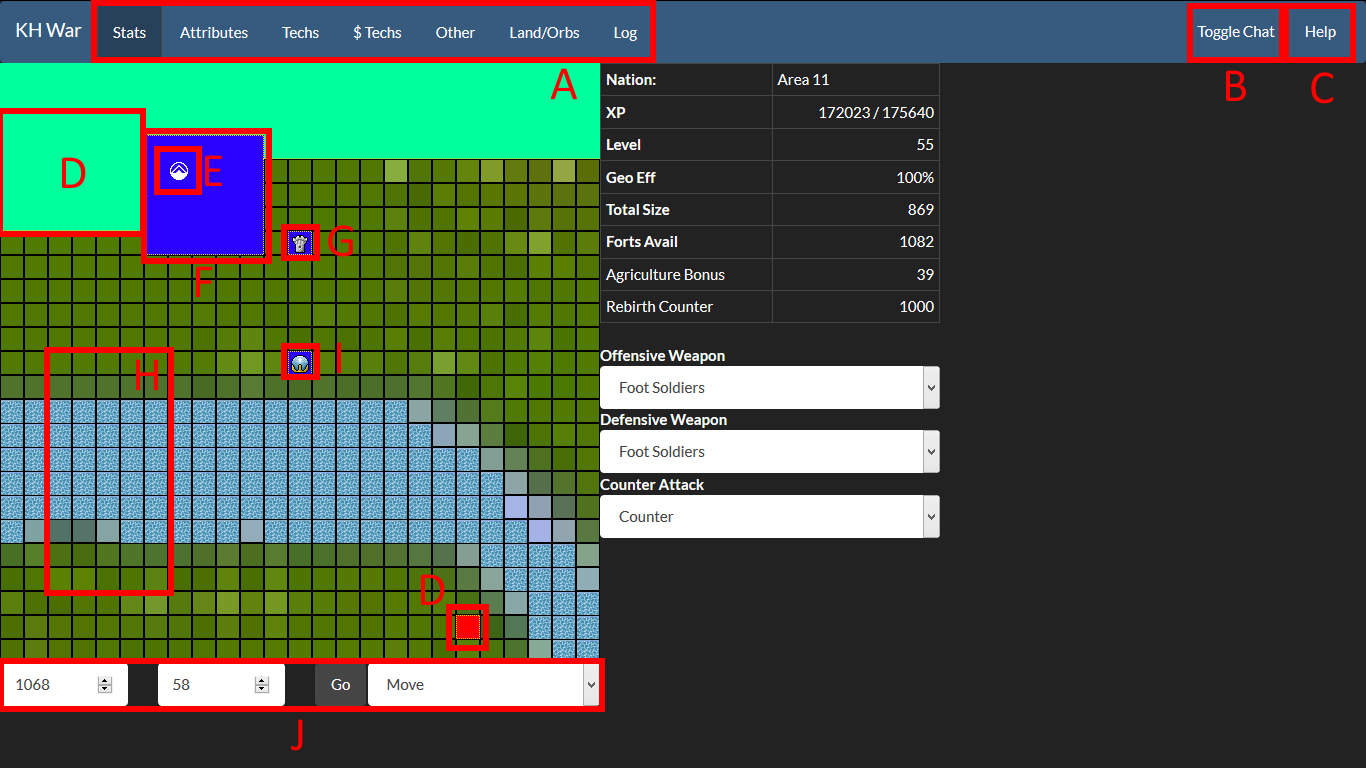
These tabs can be switched between to display various information about your region. (Anchor [Information Tabs])
B: Chat.
Pop up chat to talk with other player currently online.
C: Help Button.
Gives a brief overview of the UI buttons and what they do.
D: Enemy Tile.
Tiles another player controls.
E: Landmark. Landmarks provide various strength bonuses to the player who controls the tile. (Anchor [Landmarks])
F: Player Tile.
Tiles the player controls.
G: Fortification.
Tiles that have fortifications on. (Anchor [Fortify Command])
H: Un-controlled tiles.
Tiles not controlled by anyone.
I: Prize Orb.
Prize orbs provide a steady stream of credits for the player every 15 minutes. (Anchor [Orbs])
J: Command interface.
Used to select the command to perform (Anchor Command Interface)
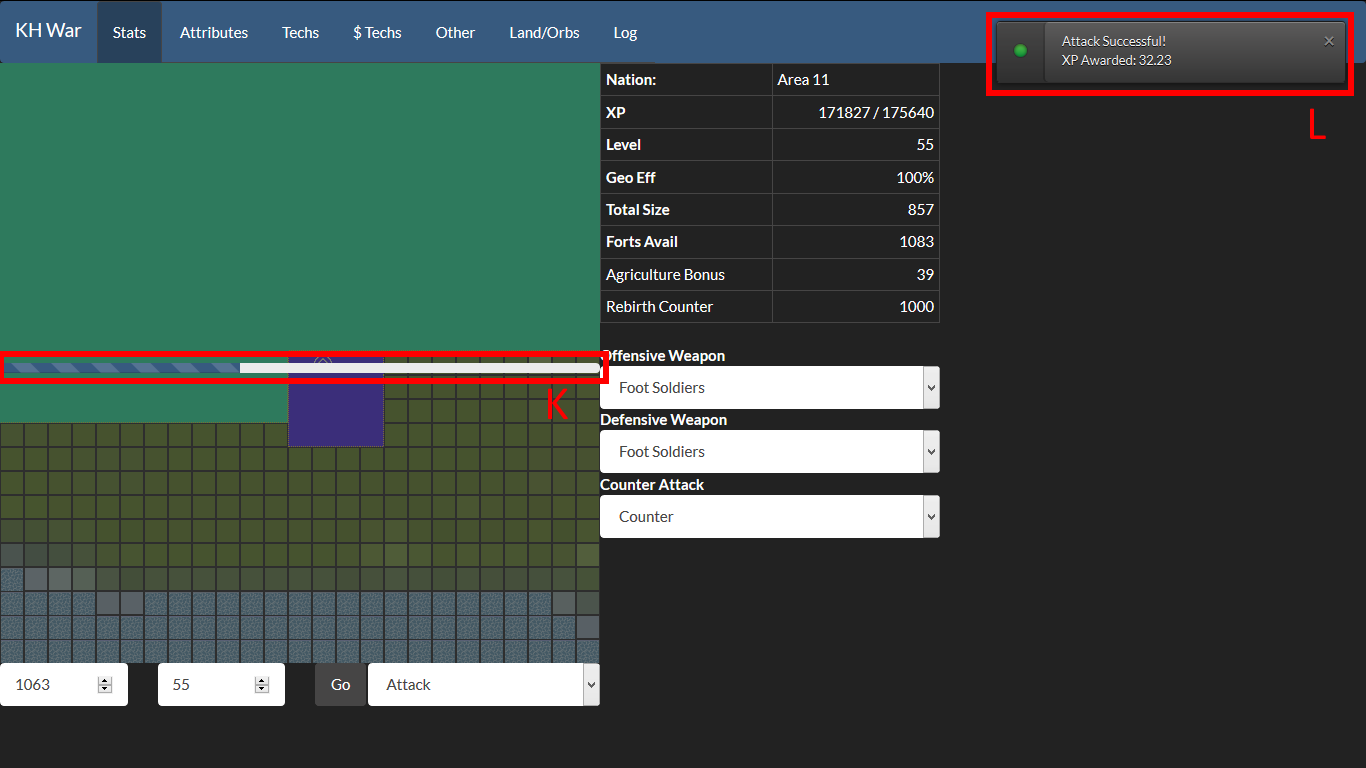
K: Delay Bar. (Anchor [Actions])
L: Status Information. (Anchor [Actions])
X: Inspect -> New Image (Anchor [Espionage?])
Y: Tooltip -> New Image
Z: Quadrant move arrows -> New Image
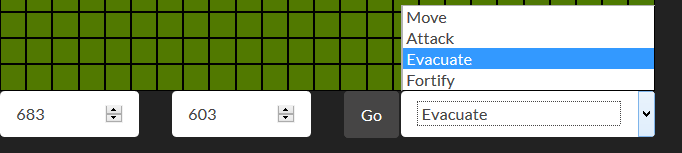
Upon performing an attack, evacuate or fortify action the delay timer will appear stopping any actions from occurring in the next 3 seconds (Fig2 (K)) and a status message will appear listing the result of the action (Fig2 (L)). This is firstly so that the auto clickers or bots cannot consume the whole map but also that the server can complete its calculations without becoming overloaded. After 3 seconds is up the delay bar will disappear and another action can be performed.
As stated previously the success rate is determined differently depending on whether the player is attacking a enemy tile or a neutral tile. If the player is attacking a neutral tile the success rate is determined entirely off your Geo Eff value (Anchor [Geo Eff Formula]). For example if my Geo Eff value was 74% I would have a 74% chance of capturing a neutral tile. However if you are attacking an enemy tile the attributes tab is used (Anchor [Attributes Tab]). Each attribute is given a random multiplier and the player with the highest combat score will win the fight.
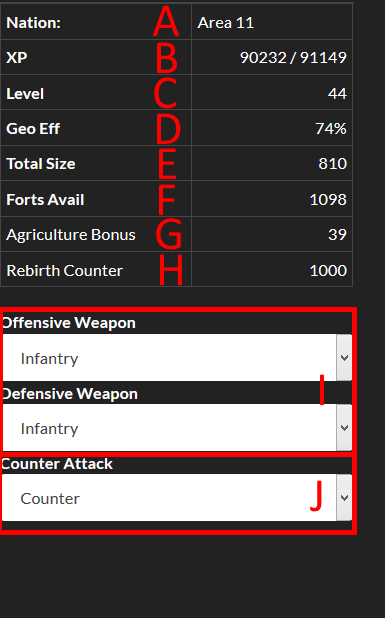
This is self explanatory. This is the name you chose for your nation when you started the game.
B: XP
This shows your current experience points with how many experience points you need to level up. Upon reaching the target you will level up allowing you to research a new tech to give you attribute bonuses as well as unlock other techs (Anchor [Technology]) also allowing you to utilise a wider variety of landmarks scattered around the map (Anchor [Landmarks]). After levelling up the target experience will increase exponentially as your level increases.
Base xp has a minimum value of 0.01 and for a neutral tile is calculated as:
 {changed and needs updating}
C: Level
This is your current in game level. This will determine which techs you can purchase (Anchor [Technology]) as well as how much experience you will gain by attacking tiles and other players.
D: Geo Eff Value
This is one of the most important values in the game as it defines how successful you will be when you attack another tile. It is determined by the shape and size of your Nation as well as any other bonuses you may have from attributes; specifically Air combat (Anchor [Attributes]). The current formula is:

Where:



Let's say I'm a level 44 player with
- 10 defensive air combat
- 5 general air combat
- 121 tiles
- 196 faces
Firstly it counts up how many tiles you have, takes the square root of it and multiplies it by 4. This will give you how many tiles you can have i.e the max faces.

Then it counts up how many exposed faces there are. Exposed faces are defined by any edges that are not touching your own territory.

Then it will calculate the size penalty which is the number of tiles you have, divided by 25 and then rounded down to a whole number.

Then it will calculate any bonuses to subtract by adding your general and defensive air combat attributes, multiplying by 2 and then adding 2.

If your level is below 100 it will subtract half of your level off 50 and then add this to your current bonus.

Finally it will sum these variables (adding the penalties and subtracting the bonuses), divide it by 100 and subtract the result from 1

So my probability of capturing a tile is 0.04 which is 4%
E: Total Size
This is a count of all the tiles that you currently control and is used to calculate your current Geo Eff value.
F: Forts Available
This is a count of how many fortifications you have available to place on your tiles. More fortifications can be purchased in the $ Techs tab (Anchor [Purchaseable Techs]).
G: Agriculture Bonus
This is a bonus defined by your agricultural attribute (Anchor [Attributes]) The value of your agricultural bonus determines how much bonus exp is awarded at the start of each day. A new day starts at midnight which runs off EST/EDT (GMT -5 hours/ -4 hours.)
H: Rebirth Counter
The rebirth counter comes into play when you hit level 100. It starts at 1000 and, depending on your level, will decrease by a set value per day (00:00 EST/EDT [GMT -5 hours/ -4 hours]). This is calculated by:

Hence at level 101 your rebirth counter will decrease by 1 per day, at level 102; 2 per day etc. When the counter reaches 0 your nation will reset including level, all techs bought or researched and captured tiles. You will earn 5% of your exp before resetting and earn 100 credits per level above 100 before the reset.
So if I was level 150 with 1,000,000 xp when the counter reached 0, I would end up with 5000 bonus credits and 50,000 xp.
I: Offensive & Defensive Weapons
Offensive and defensive weapons are purchasable techs that allow you to equip them as weapons. Each weapon has its own offensive and defensive stat boosts that will add to your current attributes. Offensive weapons will only boost your stats when attacking another player whilst defensive weapons will only boost your stats when being attacked by another player.
J: Counter
Counter is split into two separate options; "Counter" and "Counter and Invade." Countering will only activate if the attacking player fails to capture a defending players tile. If counter is selected and the counter succeeds, the attacking players tile will be destroyed and returned to neutral ground. If counter and invade is selected and the counter succeeds the attacking players tile will become the defending players tile. Counter success is determined by both the defending players counter attack attribute and the attacking players counter attack defence attribute. (Anchor[Attributes])
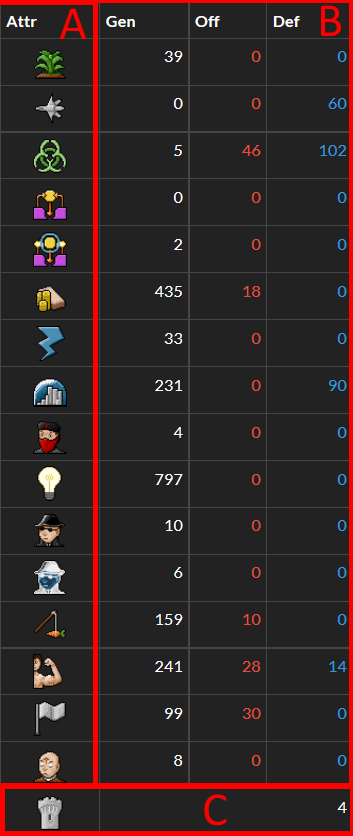
A: Attributes
Shows the attributes and images representing these attributes. From top to bottom: Agriculture, Air Combat, Biological warfare, Counter Attack, Counter Attack Defence, Economic Efficiency, Energy Production, General, Guerrilla Warfare, Innovation, Intelligence, Counter Intelligence, Motivation, Personal Combat, Persuasion, Psionics and finally Permanent Forts. These attributes are used to generate a combat score when fighting other players on the map. Each attribute is allocated a range and a random number is generated within that range. The number generated is then used as a multiplier for that attributes stats. Geo Eff is then factored in to the reduce the value with respect to the percentage that your Geo Eff is at i.e a 50% Geo Eff would halve the stats value whilst a 100% would not change it.
Certain attributes also have secondary bonuses outside of combat as listed below.
Agriculture: Determines the agricultural bonus and therefore the xp awarded each day
Air Combat: Provides a bonus when calculating Geo Eff
Counter attack & Counter attack defence: Determines the success rate of a counter attack.
Intelligence: Determines the chance of obtaining an enemy players true stats
Counter Intelligence: Determines the chance of giving false stats when an enemy inspects you.
Innovation: Provides an xp multiplier to the base experience gained. The formula for calculating this is:

B: Attribute values
This section lists the values you have for each attribute and is split into three sections. General values are used in both offensive and defensive combat calculations, offensive values are only used in offensive combat calculations and defensive values are only used in defensive combat calculations.
C: Permanent Forts
These are not used in combat calculations. At the start of a new day (00:00 EST/EDT [GMT -5 hours/ -4 hours]), if your forts available stat is lower than the displayed number then the forts available to use will be increased to this value. If your forts available is greater than this number then there will be no change. The number of permanant forts can be increased through the research of certain technologies (such as walls).
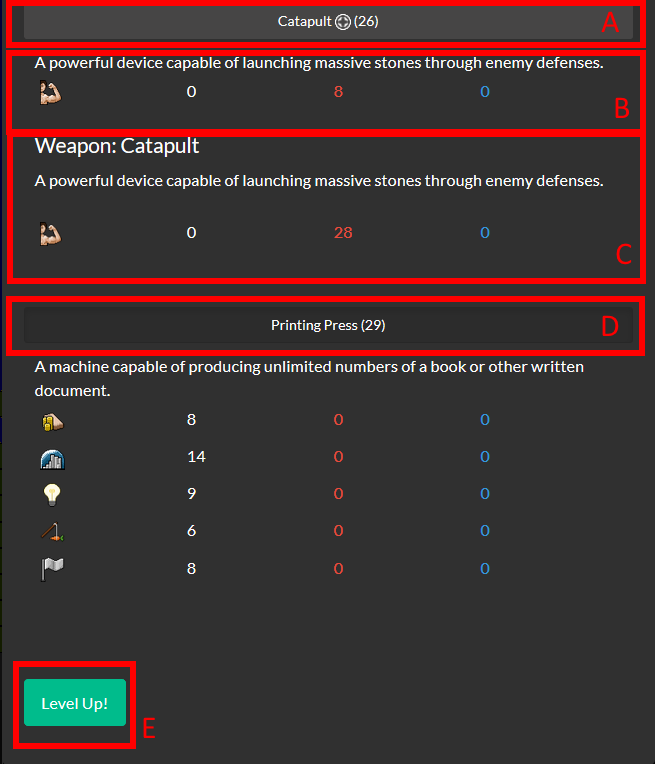
The main way to earn new technologies is through levelling up. Upon levelling you will be greeted with the pop-up shown above. This is the tech selection screen showing which new technologies you can research. The name of each tech is shown in the header with symbols denoting if there is a special addition to the tech and also the level that the tech was unlocked at (A). In the case of the Catapult the symbol in the header means it unlocks a weapon that can be equipped. Underneath the header is the description and the attribute bonuses that the technology will provide (B). If the technology allows for a new weapon to be equipped then this will be displayed underneath with the attribute bonuses this will provide should it be equipped (C). After selecting a tech to research the button will appear depressed (D) and then clicking level up (E) will research the technology and place it in your tech panel. Researching new technologies may also allow you to buy certain purchasable techs (Anchor [Purchaseable Techs]) or utilise specific landmarks (Anchor [Landmarks]).
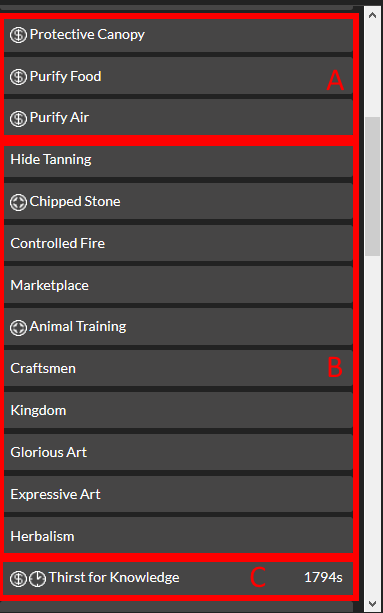
The technology tab displays all the current techs you have acquired and are split into 3 separate categories. Techs obtained through levelling up will either have no symbol next to them or the new weapon equip symbol (B). The second group is purchased technologies, obtained through spending points in the purchasable techs panel (Anchor [Purchaseable Techs]). These are defined by the money icon next to the technology name (A). The final group is temporary techs defined by the money icon and clock icon next to their name (C). Again these are obtained by spending points in the purchasable techs panel and will give you attribute bonuses for as long as they are active. The time remaining is displayed on the right hand side of the technology in seconds and upon reaching 0 the attribute bonus will be removed and the technology will have to be repurchased to acquire the bonus.

This tech panel shows you all the techs that you have unlocked for purchase. At the top it lists the number of points you have available to spend (A). Points are acquired by capturing and holding prize orbs which will generate points every 15 minutes (Anchor [Prize Orbs]). Underneath your points is the list of purchasable techs with the cost of each tech being listed on the right-hand side. Techs that are temporary again have the clock icon and, after purchasing, will return to this list when the timer has run out (B). Techs that are permanent will either have a money symbol, or alternatively, no symbol at all (C). The Treetop Defenses tech is unique in the fact that it can be purchased as many times as required with each purchase giving the player 20 fortifications to place.
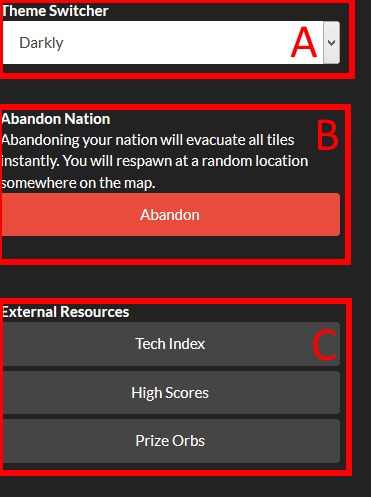
A: Theme Switcher.
This allows you to change the colour scheme of the game to best suit your style. Different themes will change the background, text colour and style and also the style of the delay bar.
B: Abandon Nation.
As it states; this will completely evacuate all your tiles. Upon clicking the Abandon button you will get one warning asking if you are sure you want to continue. Upon accepting this it will then select a random tile on the world map and spawn a single tile of your nation there. All technologies, experience and points will be kept, the only thing lost will be whatever tiles you had captured.
C: Links to useful external resources
These include a link to a list of all the technologies in the game, a second link to the high-scores which will rank players on their current level by default and the final link which lists all the prize orbs, thier locations and who currently controls them.
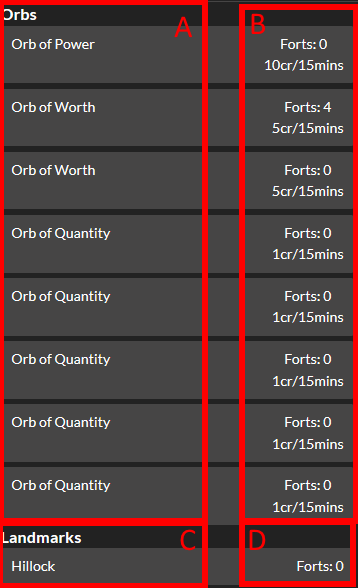
[Image neds updating with co-ordinates.]