[Sticky] Hacking _root variables with Cheat Engine
-migrated-
|
Additional Info
|
This is a guide for hacking ActionScript v2 global variables with Cheat Engine.
Quick Reference You have the variable name, and want to link to the pointer. 1. Text scan for '_level0/:varName' -> Ie.. Scan for: _level0/:gold -> Ie.. Found address: 060B3290 2. Reverse the bytes of the last address found, and Array of Bytes scan for it -> Ie.. Scan for: 90 32 0B 06 -> Ie.. Found: 05E5C66C (ends in C) 3. Subtract 07 (hex) from last address, and then Array of Bytes scan for the reverse of the result -> Ie.. Scan for: 65 C6 E5 05 -> Ie.. Found: 05ED6A18 (ends in (broken image removed) 4. Change the last digit of the previous address found from 8 to 7, and then Array of Bytes scan for the reverse of the result -> Ie.. Scan for: 17 6A ED 05 -> Ie.. Found: 0657D108 5. Manually add the last address found as a pointer with an offset as 05. You know the value, and want to find the variable name. 1. Array of Byte scan for '02 00 00 20 ?? ?? ?? ?? XX XX XX XX' where XX is the value you are scanning for in hex -> Ie.. Scan for: 02 00 00 20 ?? ?? ?? ?? A0 01 00 00 -> Ie.. Found address: 0F6341B4 (ends in 4) 2. Change the last digit of the previous address found from 4 to 7, and then Array of Bytes scan for the reverse of the result -> Ie.. Scan for: B7 41 63 0F -> Ie.. Found: 0F67E850 3. Manually add the last address found as a pointer with an offset as 05. 4. (Optional; Display variable name) Manually add address, change type to Text, click Pointer, click Add Pointer, put the current address of the pointer in with -4 at the end, and make the offset 7. Background AS2 uses _root variables as globals that can be accessed by any frame or script in the game. Hacking these variables with Cheat Engine is difficult because the values change their address any time they are updated. This makes it impossible to do normal CE scanning for root values. To deal with these values most people just use tools like Ragnarok, Katana, or VB trainers that can access and change the values with scripting. The problem is that these solutions are not always available to everyone, or someone just prefers using CE for the challenge of it. This guide should only be intended for use in AS2 games implementing global variables for users who cannot, or choose not to use Ragnarok. Please note that if you follow along with the examples below the memory addresses you see will be different from the ones in my examples. If you don't understand this then this guide may be too advanced for you. How global variables are stored in memory When you initialize a new game all of the root variables are stored in memory segments that are easily identifiable. In this example I will be using the game Mud and Blood 2, which stores everything in root variables. Start up a new game and immediately pause (space bar). Do a search for the array of bytes of 02 00 00 20. You'll probably get back about 3500 results, most of which are root variables for the game. You can identify a root variable because this array of bytes will be at an address that ends with a 4. You will generally see a large number of these in a row, separated by 16 bytes. It should look something like this. 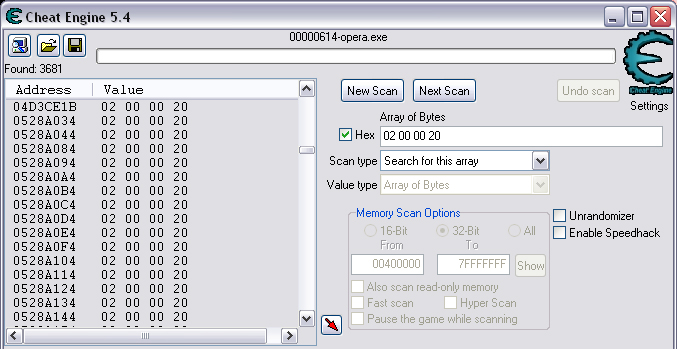 A root variable takes up four 4-byte memory segments, which is why each of these is separated by 16 bytes. The root variable will start at the -4 offset from the 02 00 00 20 array. To get an idea of what these memory segments look like, right-click on one of the returned addresses and select "Browse this memory region." Then right-click some where on the Memory Viewer and select "Goto Address." The address that you have browsed to will be automatically listed, so just add a '-4' to the end of it and click OK. 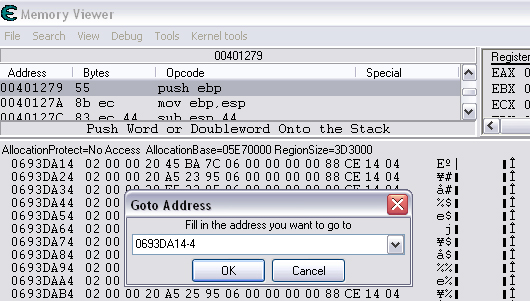 You should now see a memory region that looks something like this. 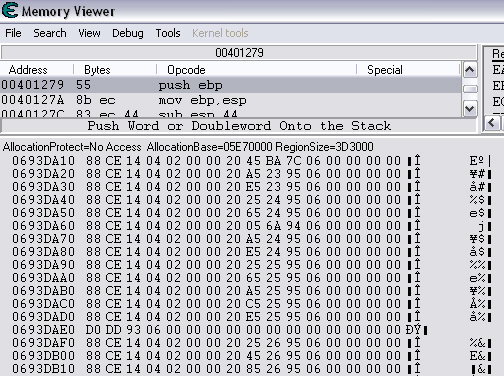 Let's break this down by looking at the first line. 88 CE 14 04 02 00 00 20 45 BA 7C 06 00 00 00 00 The first four bytes (88 CE 14 04) will always be the same for each session, but change when you reboot. At this time I am unsure what they represent. It usually is a pointer that points to a green memory segment, and can just be ignored. The second four bytes (02 00 00 20) are always the same for global variables, and are used to help you identify them. Though I am not sure at this time why this value is used. The third four bytes (45 BA 7C 06) is a pointer to the variable name. This will be different for every root variable. The fourth four bytes (00 00 00 00) is the value of the variable. You can right-click the start of this memory segment and select "Add this address to this list," and add it as a normal 4-byte value. This value will be adjusted by the AS2 *8 multiplier. So edit it as you would any other *8 value. Some times the value will be a pointer. This can mean that the value is an array, and that you have to follow the pointer to find the actual value. This is exactly how my http://Loops of Zen hack worked, though I didn't realize at the time that it was a root variable. An example of this is shown at the end of this guide. Lets take a look at the variable name, and how to trace what variable this is storing. Since memory is stored as Little Endian you have to reverse this field to find the address. In this case we reverse the bytes 45 BA 7C 06 to get the address 06 7C BA 45. So far all of the root variables I have seen store the pointer at an address that ends in a 5. This address is actually pointing to another pointer at a +07 offset from this address that ends in a 5. To see how this looks follow along. Right-click the memory viewer and go to the address of the pointer (067CBA45), and you should see something similar to this. 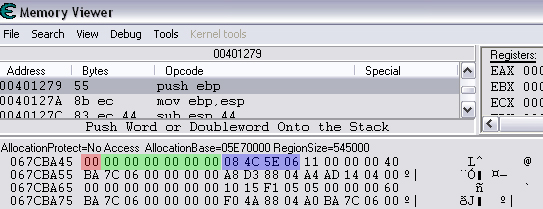 In this picture the red square is what the pointer was referencing to, the green is part of the offset, and the blue is the actual pointer to the variable name. In this case we reverse the value in the blue square (08 4C 5E 06) to find the address 065E4C08. Right-click the Memory Viewer window again and select "Goto Address." This time put in this new address, and you should find something that looks like this. 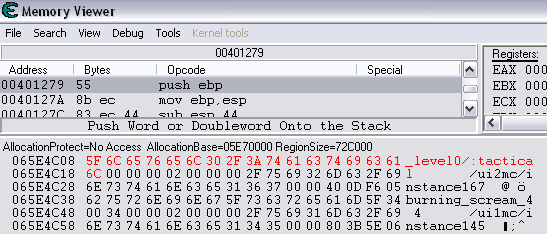 I've highlighted the variable name in red, in this case it is "_level0/:tactical". _root variables are actually _level0 variables, which is how they get stored in memory even if they are _root.<variable> in the script. We have now discovered that this root variable is named 'tactical', and has a starting value of '0'. If you go back to the root variable (in this example we go back to the memory address 0693DA10). You will notice something terrible happen when we unpause the game and let it play for a bit. As soon as our tactical points increases from 0 to 2 this entire 16-byte line of memory gets replaced by a pointer that can eventually be traced back to an empty memory segment. It will look something like this. 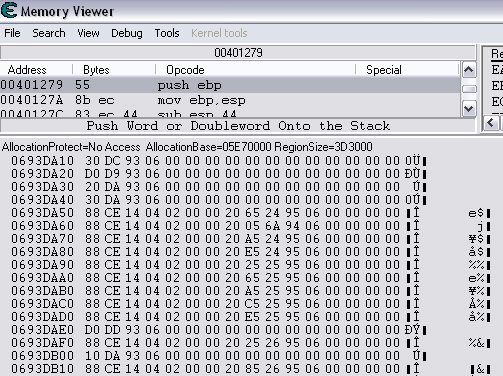 You can see that this memory view is the same range as I listed earlier. Not only has our tactical value gone away, but some additional values that we hadn't yet figured out are gone as well. This is what happens to root variables in memory when they get updated, and why it has been such a pain to hack these with Cheat Engine. What you can do to find and change these values Before the value changes you can set it to whatever you'd like. Earlier I said that when you find the value of the root variable you can add it as a 4-byte address, and then modify it as you would any other value. For instance we could have added the value for tactical to our list, changed it to 160 (a value of 20), and then called forth a tank in the game. Unfortunately as soon as we call the tank the value gets updated, and this memory segment vanishes. The good news is that we've already traced the pointers, and can find this value again. This is because although the value of the root variable jumps around in memory, the variable name does not. When we originally looked at this root variable the variable name pointer was 067CBA45. This did not change. So simply do a new search for an array of bytes of 45 BA 7C 06 (remember to reverse your address). You should only get one result, and if you browse to it you should see our root variable again. 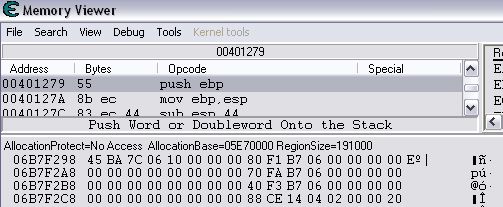 In this case we're ignoring the first 8 bytes (88 CE 14 04 02 00 00 20), and only looking at the pointer to the variable name, and variable value. The pointer is the same as it was last time, but the value is now 10 00 00 00. This is hex for 16, which divided by 8 is 2. So this means that the new value for tactics is 2. You can now add this as a 4-byte value, modify it to 160, and call a tank. This 16 byte segment will then vanish as the variable gets updated, you can do a new search for the 45 BA 7C 06 pointer to find out where it is, and do this as many times as you wish. Constantly tracking variables like this can become a pain, and luckily there is a nice pointer in memory that always tracks this for us. The pointer is in memory at a +07 offset from the beginning of this root variable segment. The root variables segments always begin at an address that ends in 0. So in the above picture if we found our new variable name pointer at 06B7F298, then switch the last digit from an 8 to 0. This is the start of the four 4-byte addresses that make up the root variable. Somewhere in memory there is a pointer that is referencing the +07 offset. So do an array of bytes scan for 97 F2 B7 06. Add this new addresses to your list as a pointer with a +05 offset. This will always point to your value in memory, and can be locked and changed as you see fit. I will have an example later in this guide where you can see how to do this. How to find the values in the first place The above information is useful and all, but it would take far too long to trace back 3000 root variables to find the one you want. So now we will find the location of the value if all we know is the variable name. I should stop for a second to acknowledge that this only really works if you know the variable name you are looking for. You will still need to rely on other resources to figure that out. Usually root variables will be posted in forums, they can be scanned for using Ragnarok or Katana, or if the SWF is not encrypted you can even decode the ActionScript and look up the variables yourself. You could do a text search in CE for _root or _level0, and identify some of the variables in the Memory Viewer if you know what you're looking for. Lets assume that we haven't done any of the work in the previous examples. We just logged on, found out that Mud and Blood 2 has a challenge to get 100 kills, and get to wave 50. We check the forums and find out that there are some root variables called stats.kills, and wave that will help us. Since every time we get a kill or change waves the value changes location in memory we won't be able to do normal CE scanning to find them. First, start a new game and pause it. We'll do the hard badge first. Do a text search for '_level0/:wave'. When we scan we find two results. Browsing each location shows us that one of the results is actually '_level0/:waveTemp', so lets just look at the other one. In my case it was found at the address 05FBFB50. 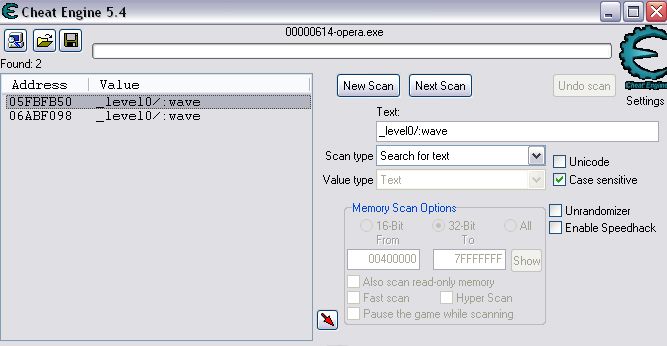 We now have to reverse this address and do an array of bytes search for it. We do a new scan for an array of bytes of 50 FB FB 05 which returns one result. 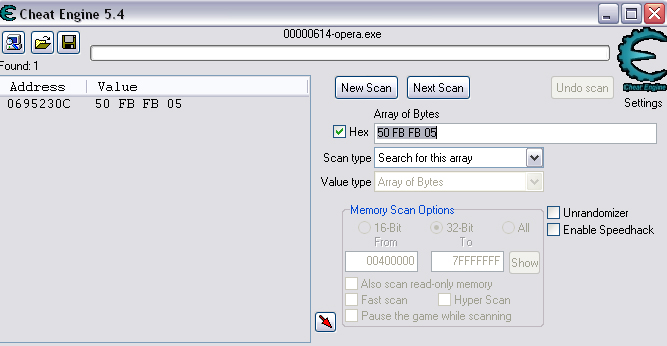 We now have the address 0695230C. From what we learned earlier, the root variable is pointing to an address at a -7 offset from this address (it was +7, but we are now going backwards from the variable name to the value). 0695230C-7 is 06952305 (which ends in a 5 just as we noticed before). Lets now reverse that new address and search for that array of bytes. 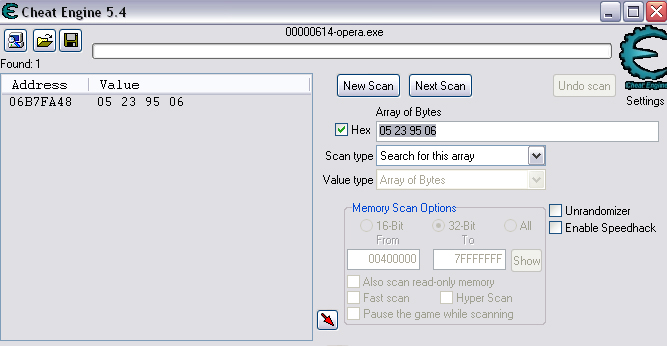 We now have one address that ends in an 8, and if we browse to it we should see a normal root variable setup. 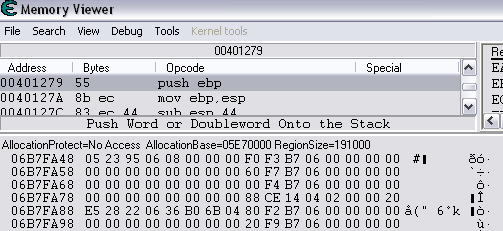 Again, the first four bytes are the pointer to the variable name that we just reversed searched for, and the next four bytes are the value. In that case the value is 8, or 1, which is what wave we are on. Since we don't need to keep tracking this, just add the address of the value to our list, and then change it to 400. Go ahead and wait for your starting four soldier to die, and you'll have your badge. For stats.kills you can do normal CE scanning for the value and edit it (search for 8, then 16, then 24, etc...). The reason for this is that stats is an array that contains the variable kills. We know this because of the period that separates the two words. In this case you can trace down stats as a root variable just like we would the wave variable. Instead of finding a value to update we would instead find a pointer. Let's say I've done the search for '_level0/:stats', and found the root variable. I browse the memory and it looks like this. 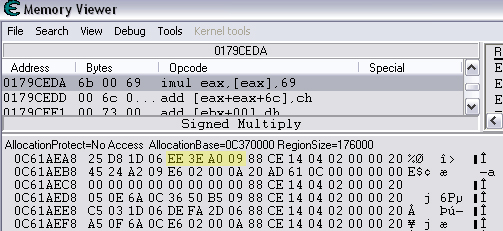 You can see here that the highlighted area is where we should have found the value, but since stats is an array we found a pointer instead. The location of an array in memory is at a +0A (10 bytes) offset from the pointer listed in this field. This was discovered during the Loops of Zen hack, and verified in Mud and Blood 2. So to find the address that contains this array we reverse this pointer (EE 3E A0 09) to 09A03EEE, and then add +0A to it to come up with 09A03EF8. If we browse to that address we see another pointer that goes to 062C5E48. This is where the values of the stats array are being stored. If we browse to that location we see something like this.  I expanded the view slightly so that you can see the entire thing. It starts at 062C5E00 and ends at 062C5EAF. We can tell this because of the rows of zeros above and below this block of data. How these arrays work is that you have a 4-byte value followed by a pointer that points to the variable name. To find the variable name you can right click the start of the pointer, select Add this address to the list, copy the address, check the Pointer box, click the Add pointer button once, paste in the address, set the offset to 1C, and click OK. Right click on this new pointer in your list and select browse this memory region. You should see the name of the variable. This variable name is added to the end of stats since it is in that array. You can see in this example that there are two values that are pointers. This is a case of the stats array containing more arrays. What you can also do is just watch these values change, and compare them to in game values and see which ones match up. However since the addresses to these array values do not change it would be much easier doing a normal CE search. This is explained just for people who want to track down these arrays in memory. Once you have found the address to kills, just change it to 800, die, and collect the medium badge. Step-by-Step Okay, I realize that the above information is complicated, advanced, and provides much more detail than most people need or want on this forum. You probably don't care about how these variables work, and you just want to know how to add them to Cheat Engine. Here is a very simple step-by-step that I hope you can follow along with. The values you get will be different from the ones in this example. Step 1, Find your variable name: You have discovered on the forums that tactical points are tracked with the root variable _root.tactical. Step 2, Search for the variable: In CE set the Value Type to Text, and search for _level0/:tactical. If you get more than one result you will need to do the remaining steps on all of them until you get the right location. Add the address to your list. 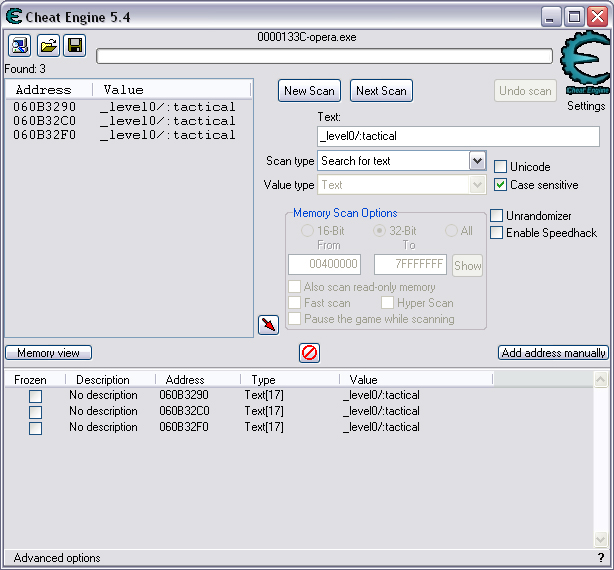 Step 3, Search for a pointer referencing this string: Reverse the order of the bytes of the address. If the address for _level0/:tactical was 060B3290, then the bytes are 06, 0B, 32, 90, the reverse order would be 90, 32, 0B, 06, and the reverse address would be 90320B06 (This is what reversing the address means in each of the next steps). Do a New Scan, set the Value Type to Array of Bytes, and search for this reversed address. You should only get one result that has an address that probably ends in a C. Add this to your list. 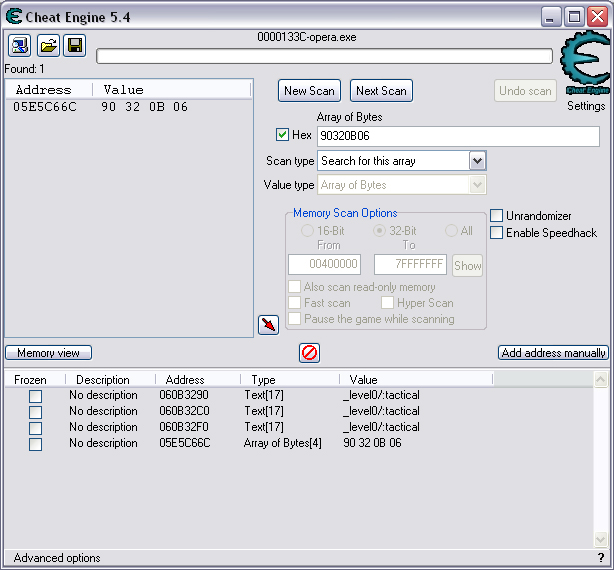 Step 4, Find the root variable: Subtract the address you found in the previous step by -07 (Hex). To do this you can use Windows Calculator. Put the calculator in scientific mode, and then Hex. Type in the last two digits of the address you found (6C), then type -7, and hit enter. This will return 65. Reverse this address from 05E5C665 to 65C6E505. Do a New Scan, set the Value Type to Array of Bytes, and search for this reversed address. You should get one result that has an address that ends in an 8. Add this to your list. 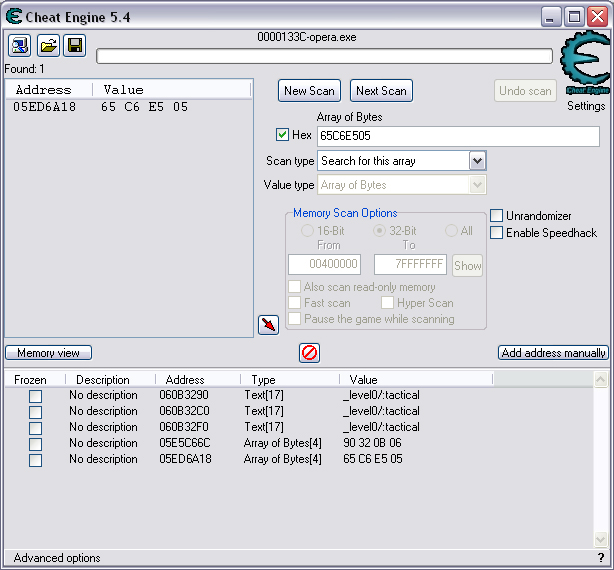 Step 5, Search for the pointer to this root variable: Change the last digit of the address you got in the last step from an 8 to a 7, and reverse it. So our 05ED6A18 address becomes 176AED05. Do a New Scan, set the Value Type to Array of Bytes, and search for this reversed address. You should get one result. Add this to your list.  Step 6, Add the new address as a pointer: Copy the address of the result we got in the last step (0657D108). Click on the Add address manually button. Check the Pointer box. Paste in the address. Set the offset to 05. Click OK.  Step 7, Change the value as you see fit: You now have a 4-byte pointer that will always be pointing to the value of _root.tactical. You can set this value to whatever you like, and lock it. Then feel free to play the game how you'd like to. 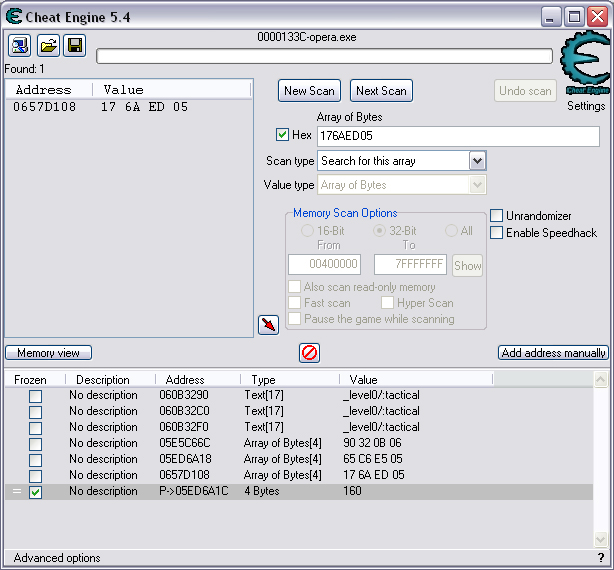  Advantages and Disadvantages The disadvantages to this is that root variable hacking is much more difficult in Cheat Engine than other tools, and usually .sol file hacking or using Ranarok would be a better option. AS2 will eventually be replaced by AS3, and this information will become obsolete. You need to know what the variable names are, which will require other tools depending on how good you are with Cheat Engine. Working with more than one value is difficult. Games that don't pause can cause issues with tracking down values (though you can still do process pausing with third party tools). The biggest advantage I see to this is that you can now find any root value in memory at the start of the game without having to do searches for changing values. For this reason root variables can be more useful, and easier to hack than normal variables. It provides an alternate way of doing things for people experiencing problems with Ragnarok, or who want to do some more advanced memory hacking. Alternative Methods Link With this method you can scan for and change values directly if they are unique enough. Videos Scanning Root Variables with Cheat Engine part 1 Scanning Root Variables with Cheat Engine part 2 In closing This guide should not be considered to be 100% accurate for every game, and is a work in progress as new information comes up. I can expand on details if any part of this is too confusing. I am assuming a certain level of familiarity with Cheat Engine for anyone trying to follow this, so some things may not make sense to beginners. |